Creating a Package

The package is the key to the registration package. The Vantora system has an incredible amount of customization that can be done at the package level, and this page will walk you through each of the fields, what they mean and give examples of how to set your packages up the way they fit your business model.

Booking Packages with full flexibility

Name

This is the name of the package. In this example, you can see it is named “Discount paintball package up to 6.”

Try to use something descriptive, but not overly lengthy. It will show up at the top of the package when someone is looking at the booking options.

Package Name for reservaitons

Minimum Players In Group

This is a mandatory field that determines when the package will display. For example, if it is set for a minimum of 5 and the customer enters a quantity of 3, they will not see this package. The number does not have to match and you can do “up to” type packages. In the example above, the minimum is set to 5 for the “Discount paintball package up to 6.”

Maximum Players In Group

Much like the minimum number, this determines if the package will be displayed based on the number of players the customer puts in for their search. If the maximum is set to 10 and a customer enters a quantity of 12, they will not see that package.

Booking Packages with full flexibility

Maximum Groups

This is the maximum number of groups of this package that will be allowed to occur simultaneously. For example, assume for this package the duration is set to three hours. Group  A books in at noon and Groups B and C book in at 1 pm, reaching the maximum number of three groups. With the maximum number of groups set to 3, no one else would be able to book that group until Group A’s time is over at 3 pm. Then, two more groups (Groups  could book in at 4 pm. Note: This also means no one could book it at 11 am, as they would not finish until 2 pm with a three hour duration, which exceeds the three person maximum at 1 pm. It would allow two groups to book in at 10 am, as there would be two groups at 10 am, three groups at noon.  Then, the 10 am groups would leave, and the two groups at 1 pm could start.

Total Number of Players In Group At Any Time

Besides limiting the number of groups, you can limit the total number of people that can be in that particular group at any given time. For example, perhaps you have an area that can only comfortably hold 40 people. We will assume that you have a package that uses that area, and that package has a minimum of 10 people and a maximum of 40 people. We will also assume that each group will have an employee helping them, and you have three employees assigned to this area. You could have book in:

  • three groups of 10, or
  • one group of 20 and two groups of 10,

The software will not allow three groups of 20 to book in, as that would be a total of 60 people, which is beyond your 40 person maximum.

If one group of 15 books in and one group of 16 books in, you would have 31 people in the area. The software would not allow another group of 10 to book in, as that would run you past the 40 maximum. Even though the number of groups would allow it, the limitation would now be based on the number of players.

Max Players at Startup

This is like the “Max Players Soft Setting” in the general registration settings, except it only applies to this particular package. Lets continue with the above scenario – max of 40 people, and three groups that can each be up to 20 people. Although you can have 40 people at a time, you would prefer to not have them all start at once. You could set the Max Players at Startup to 10 people, knowing that a minimum size group will be 10 people. That means if someone books 10 people into this package for 9 am, no one else would be able to book at 9 am, as it has reached the Max Players at Startup, which was set to 10 people. Based on the package booking interval, the next group would have to book in at 9:30 am, assuming a 30 minute booking interval, then another group could book at 10:00 am. Instead, if you set this number for 20, then one group of 10 books in, another group of 15 can book in for the same time – it will allow that as it’s a “soft setting,” not a hard ceiling like the number of groups. So now that 25 are booked in, we exceeded our 20 person Max Players, so the 10 am time slot goes away.

This is not a mandatory field and can be left blank, unless you need to limit the number of individuals starting this package at any given time to spread out their start times.

Rental Equipment

This is not mandatory, but may be a useful setting if multiple packages all use the same equipment. Let’s look at an example of a Squirt Gun War Package. Let’s assume everyone participating has to have one of the squirt guns, and you only have 50 of them. If you only had one Squirt Gun War Package, you could limit the Max Number of Players to 50 and you would not need the Rental Equipment option. However, if you have multiple packages that all use squirt guns, that would not work.

Limit reservation by available equipment

Let’s assume you have a one hour Bronze Squirt Gun Package and a two hour Gold Squirt Gun Package. To not allow more bookings than the number of squirt guns you have, you would set up Equipment from the Settings –> Registration-> Equipment menu choice. Create a new Item called Squirt Gun, and set the quantity to 50. For both the bronze and gold package, you can click the Rental Equipment drop down and choose Squirt Gun. This will only allow 50 people to be booked for both packages combined at any given time.

Using "Equipment " to reserve axe throwing lanes

You can use the equipment setting on a package to reserve by person or by booking. For example, if you have eight axe throwing lanes, you can set that as “equipment,” then a customer can make a booking that reserves one lane, or a package that reserves two lanes, etc.

But additionally, you can set it by player and have each person say they are using .25 of a lane… so “4” would use up one lane; “6” would use up one and a half lanes, etc.

Payment Type

There are multiple ways to accept payments for your booking. One of the easiest is at the package level. It is also possible to monetize your packages with Custom Fields. (Both methods are explained in the video called Setting Up Payments 1 on the Registration Page.)

Payment Options in Booking Packages

If you want to receive money for a particular package, you can monetize it through custom fields, or you can charge for the package itself. If charging by the package, the Payment Type is changed from None, to “By Player” or “By Event.” For example, if you want to charge a $100 fee to book a particular package, you would choose “By Event.” Then, whether six or 600 people are in the group (if your min and max players allows that), it will charge $100 independent of the number of players.

If you set the Payment type to “By Player” and set the Payment amount to $10, then it will simply multiply the number of players booked times the $10 to come up with the payment required.

Payment Amount

As explained above, this is the total amount that will be applied to the package, or to each person, based on what the “Payment Type” option is set for. There are two important notes concerning “Payment Amount:” 1) if there is a value in this field, it will not charge unless the Payment Type is set to something besides “none,” 2) Sales tax ,if applicable, is not added to this amount. If you need to charge sales tax, you simply include it in the price. As an example, let’s assume a 5% sales tax rate and a package is $20 per person before tax. You set Payment Type to By Player, and set the payment amount to $21. Then notate it in the Cart Description. 

Cart Description

This is not a mandatory field – it can be left blank. It’s purpose is to change what the shopping cart will say at the bottom of the page, if there is a payment set in the package details. In the example below, you will see the shopping cart says “Registration Deposit.” That is the default that will appear if the Cart Description: is left blank.

Cart Description on Bookings

If, however, you wanted to say that was payment in full for the package, you could put Payment in Full in the cart description. Try not to make this field too long, as it also has to show up as a parameter that is passed to the payment processor you are using and if too long, it will get truncated (cut off).

Continuing with the example in the Payment Amount, assume a $1 of sales tax.  $21 per person is charged to include that on a $20 package. You might have a Cart Description of: Full Payment $20 each +Tax.

If you do not require a payment on the package, or monetize the payments by the use of custom fields, this will not show up anyway, and again, can be left blank.


Booking Interval (in minutes)

This determines what times show up for customers to book. For example, if you are open for business starting at 10 am, and you have a 30 minute booking interval, the times shown will be 10:00, 10:30, 11:00, 11:30, etc. If you are set for a 90 minute booking interval, the times would be 10:00, 11:30, 1:00, etc.

Duration Interval (in minutes)

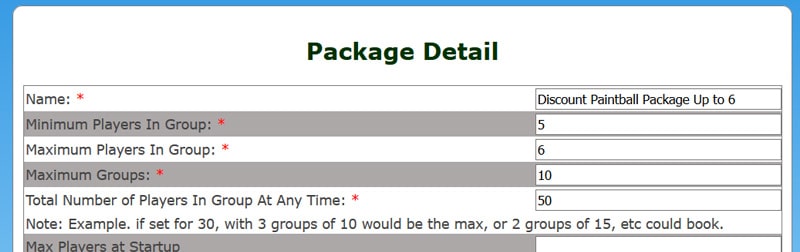
This is the setting for how long a package lasts. For some businesses, this is a hard and fast rule. For others, it’s a general average. For example, take a package for a private party that occupies a room for two hours. The duration would be 120 minutes, and the booking interval is 120 minutes. People can book that package at 10 am, noon, 2 pm, etc.

Say you also have non-private packages, and do not put a time limit on them. But, from experimentation, you have learned the average group at your field stays about 2.5 hours, so you would set the duration to 150 minutes for that package. Some may stay longer, some may leave earlier, but you have learned this is a good average. Much like restaurant reservations, they ask when you want to start, but they don’t kick you out after a set time. They know how long the average groups stays at one of their tables, and they plan their reservations around that. Perhaps a group will stay longer, and have after dinner drinks, desserts, coffee, etc., but that will be balanced by the group that wants to eat fast, and hurry out as they are heading to a movie after dinner.

Last Available Booking (in minutes)

How this setting works is basically an override of the duration above. For example, if you set a duration of 2.5 hours (150 minutes) and you close at 10 pm, the last available booking will be allowed at 7:30 pm. But, there is a chance some customers might be okay with just playing for two hours, so you can set the Last Available Booking (in minutes) to 120. Even though the average booking is 2.5 hours, you are allowing someone to book in two hours before you close, and 8 pm would show on the available selections.

Minimum Days Out

This setting determines how far in advance someone needs to make their reservation. It is important to note that each “Day” starts at midnight. So, if you have a package that has the Minimum Days Out set for 1, then someone could book in at 11:59 on the day before the event. If you set it to “0”(zero), they can book on the day of the event. It is common to set something like open play to “0,” while private events that you need to know about and staff for may be set for three or four days out.

Registration Optional Fields:

Show Time of Availability: Yes No

This setting shows the time of the package above the time selections. For example, if you have a package that is available from 10 am – 6 pm, it will show that, even though the last booking might be 4 pm, based on the Last Available Booking.

If this setting is set to No, then that line will not appear. There may be times, like a scenario game, or a clinic, etc., where you don’t want to show a specific ending time. In that case, you can toggle this setting to No.

Show Party Name: Yes No

When filling out the package details, the customer will be asked to input their party name; such as “Billy’s Birthday Party” or “Tigers Football End of Year Party” or “Bob’s Bachelor Party.” However, there may be packages where a Party Name is not applicable. For example, if you are holding a clinic or a large scenario game, they would not necessarily have a “Party Name.” For packages that do not have a party name, the customer name will be copied into the party name field.

Name of Party for Reservation

Bypass:

Facility Max Groups: Yes No

Besides just the Max Groups for a particular package listed above, you can also set a Facility Max Groups. That is set under Settings –> Registration –> General. You can opt out of any individual package with this setting. For example, assume that you you have multiple packages customers can choose from. We will say a Nerf Party, a Low Impact Paintball Party, a Standard Impact Paintball Party and Walk-On Play. Also assume that you run everything except the walk-on as private event, and you only want to run three at a time, but you don’t care if it’s three Low Impact, three Standard, or one Nerf and two Low Impact. But, you don’t want any more than one Nerf running at a time, to leave room for either two Standard, two Low Impact, or one of each. But also, at the same time, you can book in as many walk-on groups that want to come, as you run them on a different field.

To do this, under General Registration settings, you would set the Max Facility Groups to 3. (Refer to the image below.) Then, on the Nerf Package, you would set the Max Groups to 1. Make sure that all three of these packages are set to Bypass: Facility Max Groups – N. That allows the above scenario.

However, for walk-on play, you do not want that to affect the number of groups, as that is happening on a different field. For Bypass Facility Max Groups on the walk-on package, you would set it to YES.

Setting Max Groups for bookings

All: Yes No

This setting not only bypasses the Facility Max Groups, it also bypasses the other two limiting factors in the General Registration Settings of Max People Allowed Per Time Slot (Soft Setting): and Total Max Players at Facility:. Bypass all is often used if doing a large scenario-type game. Maybe your facility usually has a max of 30 people booking in any given half hour and 150 max at the facility, but on a particular day for a large scenario game, you want 500 customers all to book in to a one hour window – then you make a package and choose Bypass All – Yes.

Google Calendar Integration

Each package can be set up so every time there is a booking, it writes to your Google calendar. This can be very useful for things like private events during the week. As the setup, while easy, takes a bit of explanation, we have an entire page dedicated to it. To learn more, Click to our Google Calendar Page.

Short Description

There is a limit of 150 characters. If you have content in the short description field, the package will default to the short description view – if not, it will default to the large description. It is very highly recommended that you use short descriptions – as it gives things a cleaner, more compact look.

Change Package Graphic

This is a link that pops up a box that lets you choose preset images in different categories, or by choosing External, you can an add an URL to the image you want on the short description, such as https://www.mydomain.com/images/smallpackage1.jpg.

Images will be constrained to 266 pixels wide, so it makes sense to have your images that size to begin with to speed download time.

Description

This is an area in case you need a longer description. If there is no Short Description, it will show this description instead. If you have a short description, it will show that with a Show more… that will then pop up this description. Using the editor, you can use html if you wish, or you can use the WYSIWYG editor.

Terms and Conditions:

If you want to have Terms and Conditions for a package, type that info in here. If it is left blank, it will not prompt the customer to agree to the terms and conditions. If you do put something in this box, there will be a check box they have to click that states they agree to your terms and conditions.

The words Terms and Conditions are the link that will pop up the terms and conditions. It is suggested to have things like your cancellation or refund policy listed here, if you are collecting money for the reservation.

Confirmation Email Blurb:

There is an overall email blurb you can set in your email settings, and you can determine if you want that to be at the top or the bottom of the confirmation email the customer receives. This Confirmation Email Blurb is package specific, so you can add to the general email blurb. For example, maybe you have an overall email blurb that says, “You can order pizza from Uncle Bob’s Pizza across the street” and that goes on every email.

Let’s say you have a Nerf package – you can add a package specific email blurb such as: “Feel free to bring your own Nerf Gun to this party!”  Maybe you have a Tournament Paintball Package and want to add: “Teams must be ready at 9 am, and late show teams will be scratched from the rotation.”

Reminder Email Blurb:

This is exactly the same as the Confirmation Email Blurb, except it will be in the Reminder Email that goes out 3 days (or whatever you set in registration settings) before the event. You may want to edit it with something like, Your Event is Coming Soon!

Visible:

By default, a package is visible. That means if the parameters match up, it will display to the customer. However, if you want a package to not show up, you can uncheck this box. Reasons for doing that might be a special “By Invitation Only” package, and you are going to send an email to the customers with a direct link to the package.

And after any changes, make sure you hit the Update button to save them.

Copying an existing package

To copy an existing package, go to your package list. Click on Copy. A pop-up box will ask the name of the package and whether you want to copy all the related fees, add ons and custom fields. You can choose to copy all or none of those items. Then, simply edit the package as needed and add it to your calendar.